Step 1: Initiate Session For Consumer Identification
The payer will be identified with the consumers resource and will be
persisted to streamline future Payment Menu processes. Payer identification
is done through the initiate-consumer-session operation.
Guest Checkout: Note: If the payer is using the Payment Menu as a guest, you can go directly to step 3, which you will find on the next page.
Checkin Request
Request
1
2
3
4

POST /psp/consumers HTTP/1.1
Host: api.externalintegration.payex.com
Authorization: Bearer <AccessToken>
Content-Type: application/json
1
2
3
4
5
6

{
    "operation": "initiate-consumer-session",
    "language": "sv-SE",
    "shippingAddressRestrictedToCountryCodes" : ["NO", "SE", "DK"],
    "requireShippingAddress": true
}
| Required | Field | Type | Description |
|---|---|---|---|
| check | operation |
string |
initiate-consumer-session, the operation to perform. |
| check | language |
string |
Selected language to be used in Checkin. Supported values are Allowed locale code values: da-DK, de-DE, et-EE, en-US, es-ES, fi-FI, fr-FR, lt-LT, lv-LV, nb-NO, pl-PL, ru-RU, or sv-SE. |
shippingAddressRestrictedToCountryCodes |
string |
List of supported shipping countries for merchant. Using ISO-3166 standard. This is required unless requireShippingAddress is set to false. |
|
requireShippingAddress |
bool |
Defaults to true. If set to false we will not collect a shipping address from the consumer. |
Checkin Response
When the request has been sent, a response containing an array of operations that can be acted upon will be returned:
Response
1
2
3
4
5
6
7
8
9
10
11
12
13
14
15
16
17

{
    "token": "7e380fbb3196ea76cc45814c1d99d59b66db918ce2131b61f585645eff364871",
    "operations": [
        {   // Deprecated operation. Do not use!
            "method": "GET",
            "rel": "redirect-consumer-identification",
            "href": "https://ecom.externalintegration.payex.com/consumers/sessions/7e380fbb3196ea76cc45814c1d99d59b66db918ce2131b61f585645eff364871",
            "contentType": "text/html"
        },
        {
            "method": "GET",
            "rel": "view-consumer-identification",
            "href": "https://ecom.externalintegration.payex.com/consumers/core/scripts/client/px.consumer.client.js?token=5a17c24e-d459-4567-bbad-aa0f17a76119",
            "contentType": "application/javascript"
        }
    ]
}
| Field | Type | Description |
|---|---|---|
token |
string |
A session token used to initiate Checkout UI. |
operations |
array |
The array of operation objects to choose from, described in detail in the table below. |
rel |
string |
The relational name of the operation, used as a programmatic identifier to find the correct operation given the current state of the application. |
method |
string |
The HTTP method to use when performing the operation. |
contentType |
string |
The HTTP content type of the target URL. Indicates what sort of resource is to be found at the URL, how it is expected to be used and behave. |
href |
string |
The target URL of the operation. |
Step 2: Display Swedbank Pay Checkin Module
The response from the POST of consumer information contains a few operations.
The combination of rel, method and contentType should give you a clue how
the operation should be performed. The view-consumer-identification operation
and its application/javascript content type gives us a clue that the operation
is meant to be embedded in a <script> element in an HTML document.
In our example we will focus on using the
view-consumer-identification solution.
The redirect-consumer-identification method redirects
the user to Swedbank’s own site to handle the checkin
and is used in other implementations.
redirect-consumer-identification should only be used in
test environments. It is not suitable for the production
environment as there is no simple way of retrieving the
consumerProfileRef.
HTML
1
2
3
4
5
6
7
8
9
10
11
12

<!DOCTYPE html>
<html>
    <head>
        <title>Swedbank Pay Checkout is Awesome!</title>
    </head>
    <body>
        <div id="checkin"></div>
        <div id="payment-menu"></div>
        <!-- Here you can specify your own javascript file -->
        <script src="<Your-JavaScript-File-Here>"></script>
    </body>
</html>
The Checkin and Payment
Menu components (the two <iframe> elements) must be separate
(one must not replace the other).
Please note that nested iframes (an iframe within an iframe) are unsupported.
In the HTML, you only need to add two <div> elements to place the
check-in and payment menu inside of. The JavaScript will handle the rest when
it comes to handling the check-in and payment menu.
JavaScript
1
2
3
4
5
6
7
8
9
10
11
12
13
14
15
16
17
18
19
20
21
22
23
24
25
26
27
28
29
30
31
32
33
34
35
36
37
38
39
40
41
42
43
44
45

var request = new XMLHttpRequest();

request.addEventListener('load', function () {
    // We will assume that our own backend returns the
    // exact same as what SwedbankPay returns.
    var response = JSON.parse(this.responseText);
    var script = document.createElement('script');
    // This assumes that the operations from the response of the POST from the
    // payment order is returned verbatim from the server to the Ajax:
    var operation = response.operations.find(function (o) {
        return o.rel === 'view-consumer-identification';
    });

    script.setAttribute('src', operation.href);
    script.onload = function () {
        payex.hostedView.consumer({
            // The container specifies which id the script will look for
            // to host the checkin component
            container: 'checkin',
            onConsumerIdentified: function onConsumerIdentified(consumerIdentifiedEvent) {
                // consumerIdentifiedEvent.consumerProfileRef contains the reference
                // to the identified consumer which we need to pass on to the
                // Payment Order to initialize a personalized Payment Menu.
                console.log(consumerIdentifiedEvent);
            },
            onShippingDetailsAvailable: function onShippingDetailsAvailable(shippingDetailsAvailableEvent) {
                console.log(shippingDetailsAvailableEvent);
            }
        }).open();
    };
    // Appending the script to the head
    var head = document.getElementsByTagName('head')[0];
    head.appendChild(script);
});

// Place in your own API endpoint here.
request.open('POST', '<Your-Backend-Endpoint-Here>', true);
request.setRequestHeader('Content-Type', 'application/json; charset=utf-8');
// In this example we'll send in all of the information mentioned before,
// in the request to the endpoint.
request.send(JSON.stringify({
    operation: 'initiate-consumer-session',
    language: 'sv-SE',
    shippingAddressRestrictedToCountryCodes: ['NO', 'SE']
}));
Note that we add the script at the end of the body. This ensures that
every element (like the container <div> elements) has loaded in before we try to
access them with our script.
Monitoring The Script URL
With the PCI-DSS v4 changes taking effect on March 31st 2025, merchants are responsible for ensuring the integrity of the HTML script used in their integration, including monitoring what is loaded into or over it. Specifically, Seamless View merchants must verify that the script URL embedded in their iframe originates from Swedbank Pay or another trusted domain. It is important to note that Swedbank Pay’s PCI responsibility is strictly limited to the content within the payment iframe. For further details, refer to section 4.6.3 in the linked document.
To ensure compliance, we recommend implementing Content Security Policy rules to monitor and authorize scripts.
Merchants must whitelist the following domains to restrict browser content retrieval to approved sources. While https://.payex.com and https://.swedbankpay.com cover most payment methods, digital wallets such as Apple Pay, Click to Pay, and Google Pay are delivered via Payair. Alongside the Payair URL, these wallets may also generate URLs from Apple, Google, MasterCard, and Visa. See the table below for more information.
When it comes to ACS URLs, nothing is loaded from the ACS domain in the merchant’s end. It will either happen within Swedbank Pay’s domain or as a redirect, which will repeal the merchant’s CSP.
The list below includes important URLs, but may not be exhaustive. Merchants need to stay up to date in case of URL changes, or if you need to whitelist URLs not listed here.
For further details, refer to section 4.6.3 and 11.6.1 in this PCI-DSS document.
| URL | Description |
|---|---|
| https://*.cdn-apple.com | URL needed for Apple Pay. |
| https://*.google.com | URL needed for Google Pay. |
| https://*.gstatic.com | Domain used by Google that hosts images, CSS, and javascript code to reduce bandwidth usage online. |
| https://*.mastercard.com | URL needed for Click to Pay. |
| https://*.payair.com | URL for the digital wallets Apple Pay, Click to Pay and Google Pay. |
| https://*.payex.com | Universal URL for all payment methods except the digital wallets Apple Pay, Click to Pay and Google Pay. |
| https://*.swedbankpay.com | Universal URL for all payment methods except the digital wallets Apple Pay, Click to Pay and Google Pay. |
| https://*.visa.com | URL needed for Click to Pay. |
How It Looks
With the scripts loading in after the entire page is loaded, we can access the
<div> container that the Checkin will be hosted in. When everything has
finished loading, you should see this:
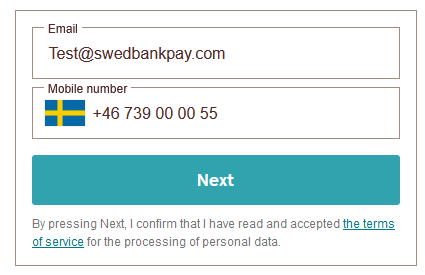
In this example, the payer’s information is pre-filled as provided by the
initial POST. If not, the fields will appear empty.
Pre-filled checkins are only available for merchants who have a specific agreement with Swedbank Pay.
From here, there are three ways forwards, depending on the consumer. If they are registered with a profile at Swedbank Pay, the information already provided will be sufficient. The consumer can simply click proceed, and the profile will appear on the page (with sensitive data masked).
If Swedbank Pay detects that the consumer hasn’t registered any personal details, two options are provided: Store details for future purchases or proceed without storing details.
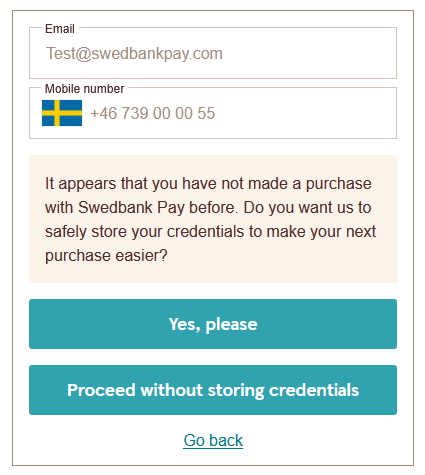
If they choose to store details, the next step is to enter their SSN.
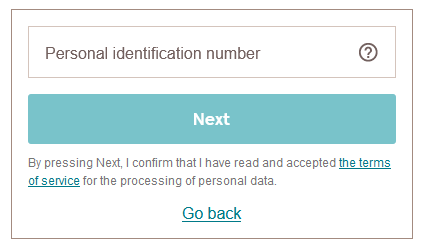
Once a valid SSN has been provided, a page for address details appears. When the consumer has entered their address, the profile box shown above will be displayed.
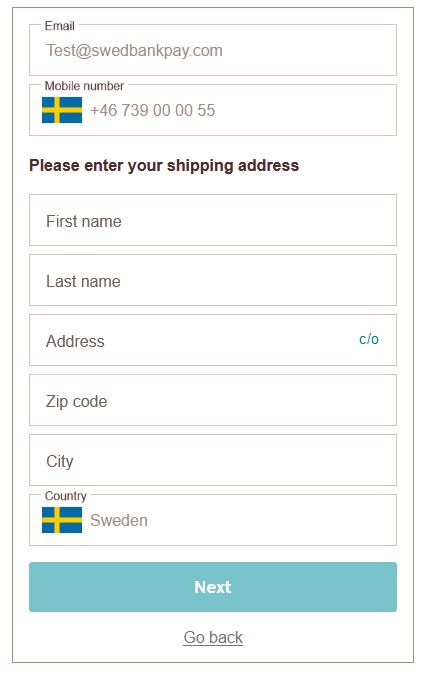
If the consumer opts out of storing their details, they will be sent directly to the page for address details to enter their shipping address. This info is not stored for future purchases. Please note that this is not the same as shopping as a guest.
With a consumerProfileRef safely tucked into our pocket, the Checkin is
complete and we can move on to Payment Menu. Be aware that
the consumerProfileRef expires after 24 hours as well as after being used to complete a payment.
The consumerProfileRef can not be reused for several purchases.
A complete overview of how the process of identifying the payer through Checkin is illustrated in the sequence diagram below.
sequenceDiagram
    participant Consumer
    participant Merchant
    participant SwedbankPay as Swedbank Pay

        rect rgba(238, 112, 35, 0.05)
            note left of Consumer: Checkin

    Consumer ->>+ Merchant: Start Checkin
    Merchant ->>+ SwedbankPay: POST /psp/consumers
    deactivate Merchant
    SwedbankPay -->>+ Merchant: rel:view-consumer-identification ①
    deactivate SwedbankPay
    Merchant -->>- Consumer: Show Checkin on Merchant Page

    Consumer ->>+ Consumer: Initiate Consumer Seamless View (open iframe) ②
    Consumer ->>+ SwedbankPay: Show Consumer UI page in iframe ③
    deactivate Consumer
    SwedbankPay ->>- Consumer: Consumer identification process
    activate Consumer
    Consumer ->>+ SwedbankPay: Consumer identification process
    deactivate Consumer
    SwedbankPay -->>- Consumer: show consumer completed iframe
    activate Consumer
    Consumer ->> Consumer: EVENT: onConsumerIdentified (consumerProfileRef) ④
    deactivate Consumer
    end
If a browser refresh is performed after the payer has checked in, the payment
menu must be shown even though onConsumerIdentified is not invoked.
Additional events during Checkin can also be implemented in the configuration
object, such as onConsumerIdentified, onShippingDetailsAvailableand
onBillingDetailsAvailable. Read more about these in the Checkin
events section.
Note on consumer data
During this stage, some consumer data is stored. Read more about our Data Protection Policy for details on which information we store and its duration.