In this chapter we provide the bare minimum implementation needed to present the Swedbank Pay UI using the Mobile SDK. There are several important limitations with this implementation that we’re listing at the end of the chapter.
Payment
To start off, you need a payment to present. If you already have a backend implementation of the Swedbank Pay APIs, you can use that to initialize a payment order. If you don’t have a backend implementation, you can manually create a payment order using Swagger or a similar tool.
For simplicity, we’re specifying some simple placeholder values and URLs when creating the payment order that you can use as well. There is no need for the bare minimum implementation to provide URLs to actual working sites:
1
2
3
4
5
6
7
8
9
10
11
12
13
14
15
16
17
18
19
20
21
22
23
24
25
26
27
28
29
30

POST /psp/paymentorders HTTP/1.1
Host: api.externalintegration.payex.com
Authorization: Bearer <AccessToken>
Content-Type: application/json;version=3.1

{
    "paymentorder": {
        "operation": "Purchase",
        "currency": "SEK",
        "amount": 1500,
        "vatAmount": 375,
        "description": "Test App Purchase",
        "userAgent": "SDK-Test",
        "language": "sv-SE",
        "urls": {
            "hostUrls": [ "https://example.com" ],
            "paymentUrl": "examplepayment://payment/",
            "completeUrl": "https://example.com/payment-completed",
            "cancelUrl": "https://example.com/payment-cancelled",
            "termsOfServiceUrl": "https://example.com/tos",
            "callbackUrl": "https://api.example.com/payment-callback"
        },
        "payeeInfo": {
            "payeeId": "5cabf558-5283-482f-b252-4d58e06f6f3b",
            "payeeReference": "AB832",
            "payeeName": "Merchant1",
            "orderReference": "or-123456"
        }
    }
}
After the payment order is created, you can fetch it to get the available
operations. The operation you’re interested in for the sake of the bare minimum
implementation is the view-paymentsession.
1
2
3
4
5
6
7
8
9
10
11
12

{
  "paymentOrder": { ... }
  "operations": [
    {
      "method": "GET",
      "href": "https://ecom.externalintegration.payex.com/psp/paymentsessions/5a17c24e-d459-4567-bbad-aa0f17a76119?_tc_tid=30f2168171e142d38bcd4af2c3721959",
      "rel": "view-paymentsession",
      "contentType": "application/json"
    }
    ...
  ]
}
The href from the operation is then used in the Android and iOS
implementations below.
Android
Integrate the SDK in your application by simply adding the dependency to the
build.gradle file:
1
2
3

dependencies {
    implementation 'com.swedbankpay.mobilesdk:mobilesdk:5.0.0'
}
Or in your gradle.kts file:
1
2
3

dependencies {
    implementation("com.swedbankpay.mobilesdk:mobilesdk:5.0.0")
}
Depending on your app, you might also need to add
androidx.appcompat:appcompat:1.6.1
Android Setup
If you would like the implementation to have basic return URL functionality
(that is, having the ability for external apps like Vipps and BankID to return
back to your app automatically after they are done) you need to make sure that
the payment URL will launch the app. A basic way to enable this is a custom URL
scheme (examplepayment://).
You can set this up using the template intent filter prepared in the SDK, that
uses a Gradle Manifest Placeholder. You do this
by specifying your custom URL scheme in you build.gradle file:
1
2
3

defaultConfig {
    manifestPlaceholders = [swedbankPaymentUrlScheme:"examplepayment"]
}
Or in your gradle.kts file:
1
2
3

defaultConfig {
    manifestPlaceholders["swedbankPaymentUrlScheme"] = "examplepayment"
}
If you plan to use something other than examplepayment://, make sure to modify
the manifest placeholder value accordingly.
Android SDK Payment Session
Next, you provide the Session URL and initiate a fetch of the payment session.
This will automatically configure the SDK with the URLs provided when creating
the payment order. You need to provide the view-paymentsession operation
href in the sessionURL parameter of fetchPaymentSession().
1
2
3

val paymentSession = PaymentSession()

paymentSession.fetchPaymentSession(sessionURL = "https://ecom.externalintegration.payex.com/psp/paymentsessions/5a17c24e-d459-4567-bbad-aa0f17a76119?_tc_tid=30f2168171e142d38bcd4af2c3721959")
You have to wait until the payment session is fetched by the SDK, and can then continue with either making payment attempts for native payment instruments, or request a web view based payment flow.
You need to listen to some state updates from the Payment session. You do this
by observing PaymentSession.paymentSessionState. In the following example, we
implement observers for the four required states.
1
2
3
4
5
6
7
8
9
10
11
12
13
14
15
16
17
18
19
20
21
22
23
24
25

PaymentSession.paymentSessionState.observe(viewLifecycleOwner) { paymentState ->
    when (paymentState) {
        is PaymentSessionState.PaymentSessionFetched -> {
            Log.d("SwedbankPay", "Payment Session Fetched")
        }

        is PaymentSessionState.PaymentSessionComplete -> {
            Log.d("SwedbankPay", "Payment Session Complete")
        }

        is PaymentSessionState.PaymentSessionCanceled -> {
            Log.d("SwedbankPay", "Payment Session Canceled")
        }

        is PaymentSessionState.SessionProblemOccurred -> {
            Log.d("SwedbankPay", "Payment Session Problem Occurred")
        }

        is PaymentSessionState.SdkProblemOccurred -> {
            Log.d("SwedbankPay", "SDK Problem Occurred")
        }

        else -> {}
    }
}
Android Present Payment
You are now ready to present the payment UI. You can ask the payment session
class to create a PaymentFragment for web view based payments. We request a
menu mode web view, without any restriction of instruments.
1

paymentSession.createPaymentFragment(mode = SwedbankPayPaymentSessionSDKControllerMode.Menu(null))
After getting back the PaymentFragment instance , you can present it in a way
that works in your application. In this example we will be using Appcompat
FragmentManager via supportFragmentManager to present the payment fragment,
meaning this code is implemented in an Activity of the app.
1
2
3
4

val containerViewId = R.id.sdk_payment_fragment // Specify a container ID for the fragment
supportFragmentManager.beginTransaction()
    .add(containerViewId, paymentFragment, "PaymentFragment")
    .commit()
When the payment is finished, you need to remove the payment fragment from the screen (again, in this example we’re accessing the Appcompat FragmentManager via supportFragmentManager, so we’re removing the payment view in a fragment transaction to close it:
1
2
3

supportFragmentManager.beginTransaction()
    .remove(paymentFragment)
    .commit()
Android Complete Code
1
2
3
4
5
6
7
8
9
10
11
12
13
14
15
16
17
18
19
20
21
22
23
24
25
26
27
28
29
30
31
32
33
34
35
36
37
38
39
40
41
42
43
44
45
46
47
48
49
50
51
52
53
54
55
56

class MainActivity : AppCompatActivity() {

    override fun onCreate(savedInstanceState: Bundle?) {
        super.onCreate(savedInstanceState)
        setContentView(R.layout.activity_main)

        val paymentSession = PaymentSession()

        paymentSession.fetchPaymentSession(sessionURL = "https://ecom.externalintegration.payex.com/psp/paymentsessions/5a17c24e-d459-4567-bbad-aa0f17a76119?_tc_tid=30f2168171e142d38bcd4af2c3721959")

        PaymentSession.paymentSessionState.observe(this) { paymentState ->
            when (paymentState) {
                is PaymentSessionState.PaymentSessionFetched -> {
                    Log.d("SwedbankPay", "Payment Session Fetched")

                    // Reqeust a web based payment fragment instance
                    paymentSession.createPaymentFragment(mode = SwedbankPayPaymentSessionSDKControllerMode.Menu(null))
                }

                is PaymentSessionState.ShowPaymentFragment -> {
                    Log.d("SwedbankPay", "Show Payment Fragment")

                    // Present payment fragment to user
                    val containerViewId = R.id.sdk_payment_fragment // Specify a container ID for the fragment
                    supportFragmentManager.beginTransaction()
                        .add(containerViewId, paymentState.fragment, "PaymentFragment")
                        .commit()
                }

                is PaymentSessionState.PaymentSessionComplete,
                is PaymentSessionState.PaymentSessionCanceled -> {
                    Log.d("SwedbankPay", "Payment Session Complete / Canceled")

                    // Remove the payment fragment
                    val paymentFragment = supportFragmentManager.findFragmentByTag("PaymentFragment")
                    if (paymentFragment != null) {
                        supportFragmentManager.beginTransaction()
                            .remove(paymentFragment)
                            .commit()
                    }
                }

                is PaymentSessionState.SessionProblemOccurred -> {
                    Log.d("SwedbankPay", "Payment Session Problem Occurred")
                }

                is PaymentSessionState.SdkProblemOccurred -> {
                    Log.d("SwedbankPay", "SDK Problem Occurred")
                }

                else -> {}
            }
        }
    }

}
iOS
Integrate the SDK in your application by either using Swift Package Manager or CocoaPods.
Swift Package Manager
The package repository URL for the SDK is
https://github.com/SwedbankPay/swedbank-pay-sdk-ios.git.
Add the SwedbankPaySDK library, there is no need to add the
SwedbankPaySDKMerchantBackend library for the bare minimum implementation.
CocoaPods
Add the dependency in your Podfile:
1

pod 'SwedbankPaySDK', '~> 5.0.0'
iOS Setup
If you would like the implementation to have basic return URL functionality
(that is, having the ability for external apps like Vipps and BankID to return
back to your app automatically after they are done) you need to make sure that
the payment URL will launch the app. A basic way to enable this is a custom URL
scheme (examplepayment://).
The easiest way to add a URL scheme to your app is to select the project file,
go to the Info tab, scroll down to URL Types, and click the + button to
add a new scheme. Insert examplepayment to the URL Schemes field. You can
choose the URL Identifier freely, but remember that that it should be unique.
The Role for the url type should be Editor. Finally, to mark this url type
as the Swedbank Pay payment url scheme, open the Additional url type
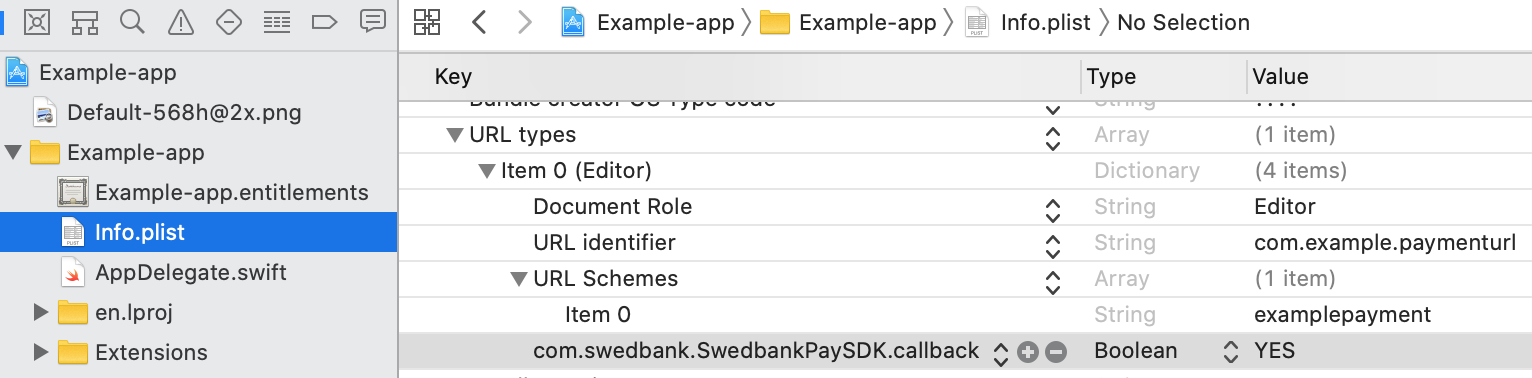
properties, and add a property with the key
com.swedbank.SwedbankPaySDK.callback, type Boolean, and value YES.
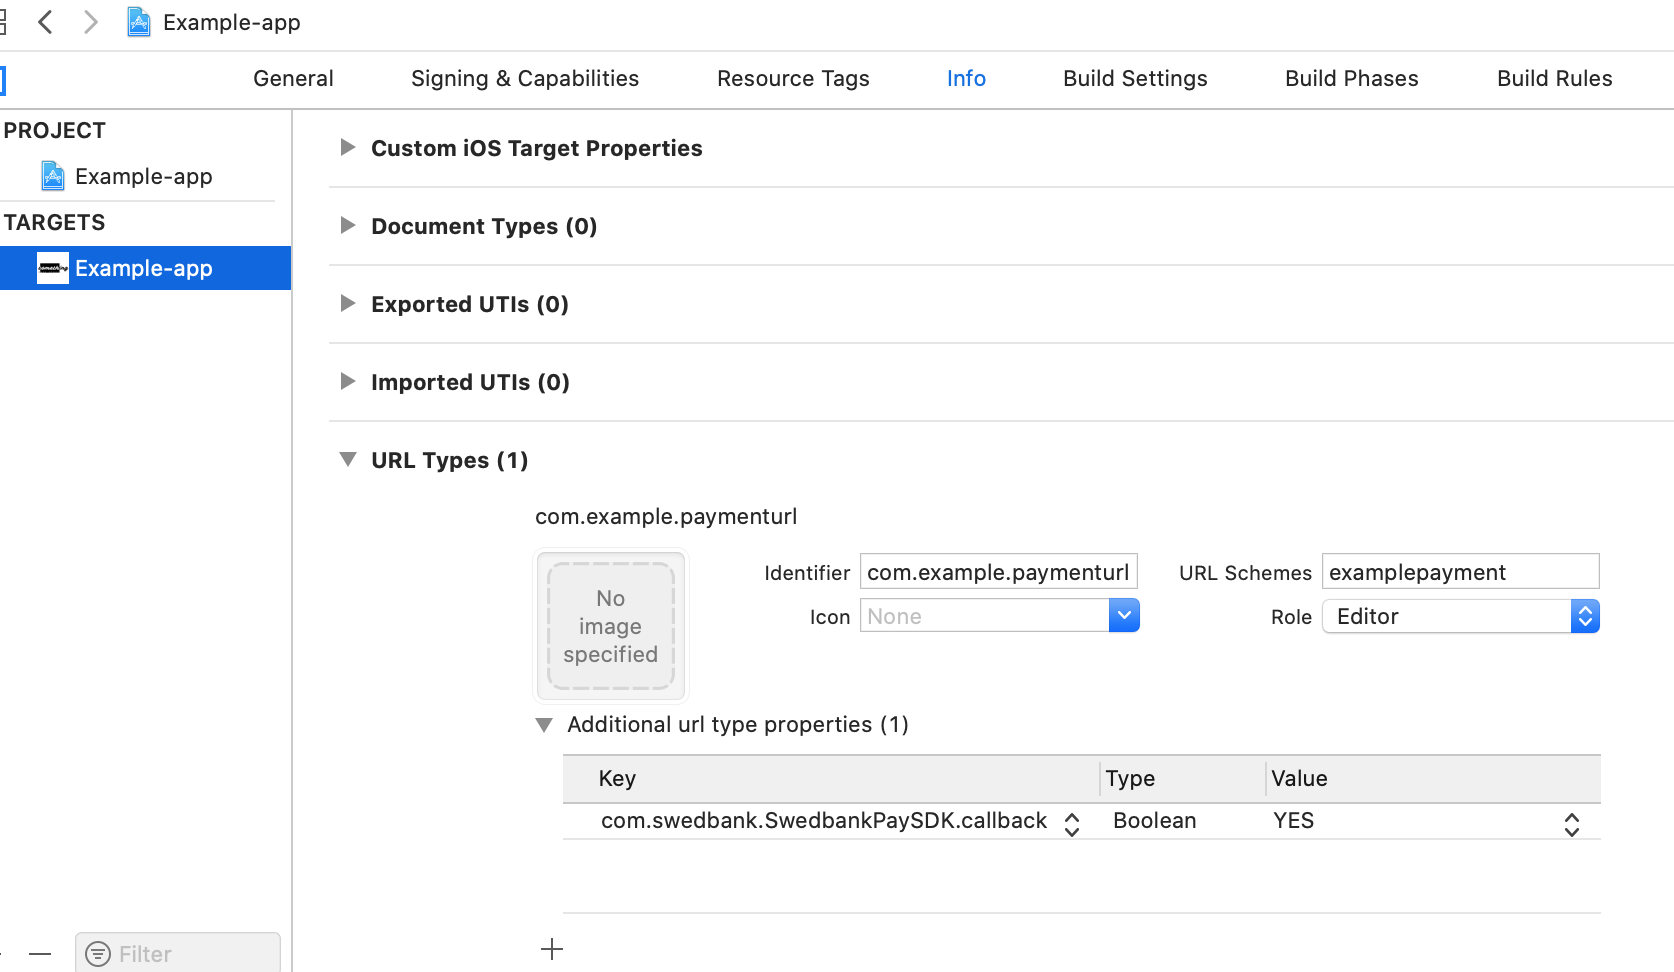
You can also edit the Info.plist file directly, if you wish.
If you plan to use something other than examplepayment://, make sure to modify
the URL scheme value accordingly.
To forward the custom-scheme payment urls to the SDK, implement the
application(_:open:options:) method
in your application delegate, and call SwedbankPaySDK.open(url: url) to let
the SDK handle the url.
1
2
3

func application(_ app: UIApplication, open url: URL, options: [UIApplication.OpenURLOptionsKey : Any] = [:]) -> Bool {
    return SwedbankPaySDK.open(url: url)
}
iOS SDK Payment Session
You need to listen to some state updates from the Payment session. You do this
by implementing the SwedbankPaySDKPaymentSessionDelegate protocol. In the
following example, we implement the delegate protocol and the required
methods.
1
2
3
4
5
6
7
8
9
10
11
12
13
14
15
16
17
18
19
20
21
22
23
24
25
26
27
28
29
30
31
32
33
34
35

func paymentSessionFetched(availableInstruments: [SwedbankPaySDK.AvailableInstrument]) {
    print("Available Instruments Fetched")
}

func sessionProblemOccurred(problem: SwedbankPaySDK.ProblemDetails) {
    print("Session Problem Occurred")
}

func sdkProblemOccurred(problem: SwedbankPaySDK.PaymentSessionProblem) {
    print("SDK Problem Occurred")
}

func paymentSessionComplete() {
    print("Payment Session Complete")
}

func paymentSessionCanceled() {
    print("Payment Session Canceled")
}

func showSwedbankPaySDKController(viewController: SwedbankPaySDKController) {
    print("Show Swedbank Pay SDK Controller")
}

func show3DSecureViewController(viewController: UIViewController) {
    print("Show 3D Secure View Controller")
}

func dismiss3DSecureViewController() {
    print("Dismiss 3D Secure View Controller")
}

func paymentSession3DSecureViewControllerLoadFailed(error: Error, retry: @escaping ()->Void) {
    print("3D Secure View Controller Load Failed")
}
Next, you provide the Session URL and initiate a fetch of the payment session.
This will automatically configure the SDK with the URLs provided when creating
the payment order. You need to provide the view-paymentsession operation
href in the sessionURL parameter of fetchPaymentSession().
1
2
3
4
5

let paymentSession = SwedbankPaySDK.SwedbankPayPaymentSession()

paymentSession.delegate = self

paymentSession.fetchPaymentSession(sessionURL: URL(string: "https://ecom.externalintegration.payex.com/psp/paymentsessions/5a17c24e-d459-4567-bbad-aa0f17a76119?_tc_tid=30f2168171e142d38bcd4af2c3721959")!)
You have to wait until the payment session is fetched by the SDK, and can then
continue with either making payment attempts for native payment instruments, or
request a web view based payment flow. For the bare minimum implementation,
we’re only looking at the web view based payment flow, and you can therefore
ignore the availableInstruments parameter.
1
2
3

func paymentSessionFetched(availableInstruments: [SwedbankPaySDK.AvailableInstrument]) {
    // No need to look at availableInstruments, continue with showing the payment menu
}
iOS Present Payment
You want to listen to some basic state updates from the payment UI and dismiss
the view when it’s finished. We will be presenting the payment view controller
modally in the implementation further down, so we can use dismiss() to close
it:
1
2
3
4
5
6
7
8
9

func paymentSessionComplete() {
    dismiss(animated: true)
    print("Payment Session Complete")
}

func paymentSessionCanceled() {
    dismiss(animated: true)
    print("Payment Session Canceled")
}
You are now ready to present the payment UI. You can ask the payment session
class to create a SwedbankPaySDKController for web view based payments. We
request a menu mode web view, without any restriction of instruments.
1

paymentSession.createSwedbankPaySDKController(mode: .menu(restrictedToInstruments: nil))
The SwedbankPaySDKController instance is returned via the
showSwedbankPaySDKController(viewController:) delegate method. After getting
back the SwedbankPaySDKController instance , you can present it in a way that
works in your application (again, in the example we’re presenting the view
controller modally):
1
2
3
4

func showSwedbankPaySDKController(viewController: SwedbankPaySDKController) {
    present(viewController, animated: true)
    print("Show Swedbank Pay SDK Controller")
}
You can now finish the payment in the web based Swedbank Pay Menu, and when the
payment is complete, you will be called with the paymentComplete() delegate
method and the payment menu will close.
iOS Complete Code
1
2
3
4
5
6
7
8
9
10
11
12
13
14
15
16
17
18
19
20
21
22
23
24
25
26
27
28
29
30
31
32
33
34
35
36
37
38
39
40
41
42
43
44
45
46
47
48
49
50
51

class ViewController: UIViewController, SwedbankPaySDKPaymentSessionDelegate {
    let paymentSession = SwedbankPaySDK.SwedbankPayPaymentSession()

    override func viewDidLoad() {
        super.viewDidLoad()

        paymentSession.delegate = self

        paymentSession.fetchPaymentSession(sessionURL: URL(string: "https://ecom.externalintegration.payex.com/psp/paymentsessions/5a17c24e-d459-4567-bbad-aa0f17a76119?_tc_tid=30f2168171e142d38bcd4af2c3721959")!)
    }

    func paymentSessionFetched(availableInstruments: [SwedbankPaySDK.AvailableInstrument]) {
        print("Available Instruments Fetched")
        paymentSession.createSwedbankPaySDKController(mode: .menu(restrictedToInstruments: nil))
    }

    func sessionProblemOccurred(problem: SwedbankPaySDK.ProblemDetails) {
        print("Session Problem Occurred")
    }

    func sdkProblemOccurred(problem: SwedbankPaySDK.PaymentSessionProblem) {
        print("SDK Problem Occurred")
    }

    func paymentSessionComplete() {
        dismiss(animated: true)
        print("Payment Session Complete")
    }

    func paymentSessionCanceled() {
        dismiss(animated: true)
        print("Payment Session Canceled")
    }

    func showSwedbankPaySDKController(viewController: SwedbankPaySDKController) {
        present(viewController, animated: true)
        print("Show Swedbank Pay SDK Controller")
    }

    func show3DSecureViewController(viewController: UIViewController) {
        print("Show 3D Secure View Controller")
    }

    func dismiss3DSecureViewController() {
        print("Dismiss 3D Secure View Controller")
    }

    func paymentSession3DSecureViewControllerLoadFailed(error: Error, retry: @escaping ()->Void) {
        print("3D Secure View Controller Load Failed")
    }
}
Limitations of the minimal implementation
While you can use the steps above to present a payment UI in your apps with very little work, there are several limitations to the implementation that you should consider before choosing how to implement the full payment in your apps.
Dynamic Session URL
For simplicity, we’ve hardcoded the Session URL needed to fetch the payment session in the SDK. In an actual application, you instead need to fetch this URL from your own backend and supply it to the SDK.
Cancelling payment
In this implementation, we haven’t included a way for the user to cancel the payment order. You could achieve this functionality by adding a cancel button to your UI (for example providing a navigation bar with a close button for the payment UI view controller/fragment), and cancelling the payment order via your backend.
Payment URL Handling
In this minimal implementation, we used custom URL scheme for the payment URL. This causes several issues in a production environment:
- On iOS, using custom URL schemes instead of Universal Links comes with several drawbacks, including prompting the user with an additional confirmation popup as well as being unable to verify URL ownership to your specific app (other apps can declare the same custom URL scheme outside of your control).
- There are a few, albeit rare, scenarios where the user can end up launching the Payment URL in the mobile browser on their phone. For URLs with custom schemes that’s handled nicely, but for universal URLs, it’s more problematic. This means that browsing to the payment URL ideally should return a view that redirects the user to the app. We provide example on how to implement this in the next chapter Custom Backend.